


Navigate: Academic Planner Overview
Introducing Navigate's Student Academic Planner
Academic Planner Locations
Academic Planner is a course planning tool designed to help students plan classes for their current and upcoming terms.
Desktop View
On desktop, students can access Academic Planner by selecting the Planner tab.

Mobile App View
In the mobile app, Academic Planner is located as the icon in the bottom right corner of the footer menu.

My Planner using the Academic Planning Tool
Below is the My Planner page that appears when the student accesses the Planner. Note that the example is of a student who has previously begun using the Academic Planning tool.
Desktop View - My Planner

Mobile App View - Planner

My Planner Page
My Planner has three sections.
- Planning Tools
This part of Academic Planner contains template plans the student has added, the ability to search for courses in the course catalog, and links to advisor plans that have been sent to the student. - Selected Template Details
The center panel shows the student's selected template. This panel will populate with the Advisor Plans when the student selects it from Planning Tools. Students can expand or collapse all slots on this panel when reviewing a template. - My Academic Plan
This panel shows the terms students have added to their plan as well as any courses or placeholders added to the terms. Students can schedule their courses if registration is open by going to the scheduler. Remind students that planned courses in Academic Planner are neither scheduled nor registered.

How to add a Template in My Planner
To add a template and create a plan from the template,
the student clicks Add Template in the Templates section of Planning Tools.
A list of templates appears in the center panel. Templates that match the student's current academic goal(s) and catalog year will be indicated with a green star in the Recommended column and appear at the top of the list.
To add a template from the list, the student clicks the Add to My Templates button. The student can also search for a template using the search bar.

How to add Terms to a Template
To add a term, the student goes to the My Academic Plan panel and selects Add a Term from the menu. A list of terms appears below the button. The student then selects a term and it is added to the plan.
Students can then plan courses for the term, or remove the term. They can also see credits planned for a term and if a term is finished, the credits earned.
Adding Courses to an Academic Plan
Important: Adding courses to an Academic Plan does not mean the student has scheduled or registered for those courses.

To see what courses fulfill the template slot's requirements, students click the arrow next to a slot to expand.

To add a specific course in an academic plan, click the arrow and expand the slot. The list of courses will appear. Click the menu next to the course to add, click Add to Term, then select a term from the dropdown that opens.

In the Mobile App, click on the three dots then select the the appropriate term.


Reviewing Advisor Plans
In Academic Planning, advisors can create full Advisor Plans for students. These are visible on the list of Advisor Plans, which can be found in Planning Tools. Students can see all sent advisor plans. Students can add individual slots to terms from Advisor Plans just as they can from other templates.
When a student selects an Advisor Plan, it appears in the center panel. Students can add individual slots to terms from Advisor Plans just as they can from other templates.
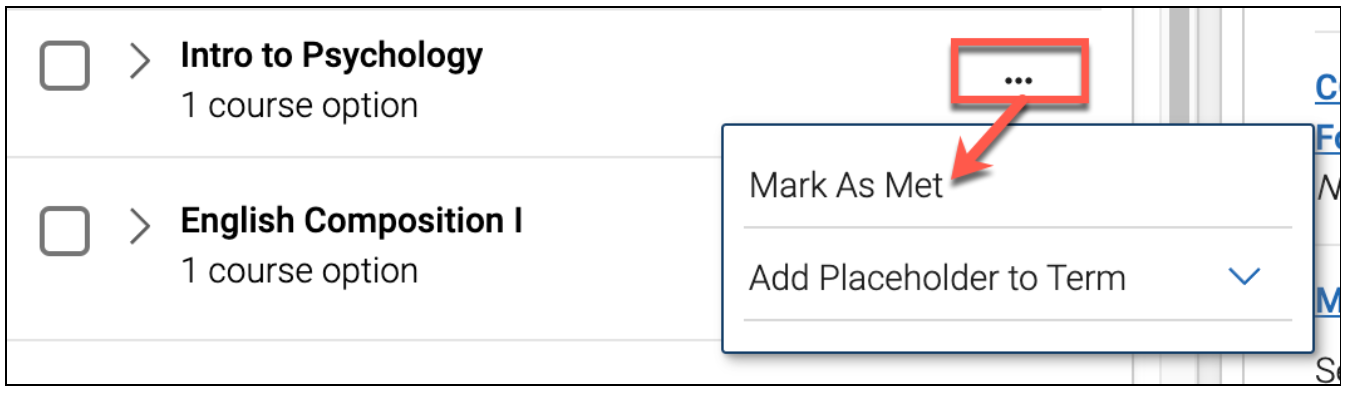
Marking Template Slots as Met
Some requirements on your academic plan may already be completed through transfer courses or exams. If that’s the case, you can use the Mark as Met feature in Academic Planner.
To do this, open the course placeholder or empty slot on your template that you believe you’ve already completed. From the menu, select Mark as Met. This lets you indicate that the requirement has been fulfilled without adding a new course.
Use Mark as Met anytime you’ve met a requirement in a way other than taking a class listed on the template.
Printing a Plan
Students can print their planned and completed terms by selecting Print from the My Academic Plan menu. The student can print the plan that opens or save it as a PDF.
Next Steps
After planning courses, the next step is to schedule and register once registration opens for upcoming terms. During this process, students will be able to:
- Review course details
- Choose preferred modality (on-campus, online, hybrid)
- Select campus or times
- Check course availability